Wednesday, 11 May 2016

Being a woman in tech. The bad parts.

There's a lot of talk about women in tech, why there are so few of us and what can be done about it. I don't have the answer to that. I know that I work with things I love and I wish that no one would have to avoid following this path because of discrimination for whatever reason.

Where are the female programmers?

I started working as a programmer in 1997. From 1997 up until 2011, I worked at 8 different companies, ranging from 3 employees to 240. During that time, I only had three other female developer colleagues. I ran into one more, who came in as a short time consultant at my then current company. And I worked with a female DBA. There. That's it. And male developer colleagues? Well, I'd say around 80. From 2011 to 2014, I worked at Thomas Cook in Stockholm who actually had around 15-20% female developers. So whatever they're doing, it's working. :)

And is there a problem?

When I started working as a developer, I never even thought about the fact that I was one of very few female developers. Back then, the Internet had just arrived and we were all trying to learn and keep up with the new technology. I never noticed anyone saying anything or received any remarks about being female. The dotcom-business was booming, everyone was having fun and the industry was taking shape.

But 10 years later, I thought about it a lot. And I know I was wondering if a rookie female developer would walk through these doors, would she stay? Maybe it was because the dotcom-era ended, and we - the happy new Internet people - were scattered and ended up in old school companies where murky dusty views of women and tech were residing.

It's not the small things that idiots say and do

So, I guess I've had the same experience as most women in male dominated environments. I've spoken up because something is not working and blokes loudly comment "Oh, I guess it's PMS-time", followed by big laughs from the others. Or the classic mumbling "I guess someone didn't get some last night". Or maybe the "Look out, she's gonna start crying". Classical condescending bullying. I suppose it can happen anywhere. Or can it? Has it happened to you while standing with your 30yo-something developer peers?

Or yeah, the "What do you prefer, frontend or backend?" from completely unknown blokes at a tech conference, followed by the traditional laughs. That's also a classic. Heard that more than once. Pattern here is men in group. No one would act like that if it was just me and him. But that's just it. As a female developer, it's hard not to bump into men in group.

And of course, not all men. Very few men, actually. Immensely few! But it doesn't have to happen that many times before you start to back away from it all. Not enough to scare me out of tech, but maybe enough to make me avoid crowds and not speak up and draw attention to myself.

It's worse with the more subtle things

You know when you go up to a group of developers that stand around talking and laughing at a conference or meetup and suddenly they get all quiet and the person who was talking won't finish what he was saying? And it gets really awkward and you know that you shouldn't have gone up to them. That feeling.

Again, making me keep to myself at those events. Which I wish I wouldn't do. But for me, it's not about mingling and networking, it's about listening to the sessions and in between, staying invisible and probably leaving early. I just don't feel like I'm part of the developer community.

Then there are the things that are hard to deal with

"We really want to hire women", they say. And then you start working there as their first female dev and at least five male devs say - in one way or another - "We are so eager to hire women, but I think they should have hired the best developer instead." BAM, kind of. It's sad. And hard to handle. And leaving me with the feeling that I ALWAYS ALWAYS have to prove myself, to show that I am good enough to deserve this job.

And that time, when I had been working as a backend developer and architect in a very complex domain for years, and went to a interview for a job in exactly the same domain. I got a no because I had "too much of a frontend profile". And we hadn't discussed frontend at all because I really knew nothing about it. But I guess they thought that my pink laptop bag was full of gifs and jpegs.

But nothing is as hard as being invisible

So I worked in this team as an architect together with two other blokes. One of which, after 3 months in our team, for the first time asks me a question: "what colours and icons should I use for the dashboard?". And I say "I have no idea, talk to the designer". And he says "isn't this what you do?". After 3 months of stand-ups, hadn't he listened or did he just want to push me down? Who knows. I'm just trying hard not to care.

But the worst thing with being invisible is when people from other teams or the business don't talk to me. If there's a bloke around, they talk to him. It doesn't matter if he's the designer or whatever. All questions on technical issues gets directed to the man in the room. I've had team mates apologising to me because they've been asked things when they think everyone should know I'm the one to go to. Sometimes it has felt really hopeless. And I've been seriously doubting my competence since people don't talk to me. I still am, not because these things happen to me very often, but because of the bulk of it all during my 20 years as a developer. I work and work and learn and learn, but I'm still no one. Just that person fulfilling the gender quota.

There's more of course. These things are just some samples of everything that has made me have that lump of uncertainty in my belly all these years. But in the big whole, it is just a few people, a few companies and a few events that have caused it. The majority of people I've met in tech are lovely, creative people that I've really enjoyed working with. I just wish that on any one of those bad events I've experienced, someone else would've spoken up and said something. Maybe I wouldn't have felt so alone, exposed and so much like not belonging there. If you want to help making the developer community a more including one, start there.

Sunday, 24 April 2016

Build a solderless Big Red Button using Raspberry Pi and Node.js

The Big Red Button

This is a simple tutorial for building your own Big Red Button, used to do whatever you come up with. Here, I use Node.js to make the button active at a set interval. If pressed while active, it fetches cat clips from Youtube and posts it on Twitter.


You can of course do whatever. If you can reach something through an API, it's easy to work with. Or, maybe use Selenium Webdriver and trigger something by visiting a website? At work, we use the button to listen to our deploy system Octopus and trigger deploys to production when they're available.

What you need:

  • Raspberry Pi with built in wifi/wifi dongle
  • Formatted microSD-card
  • Adafruit Large Arcade button with built in resistor
  • 4 jumper cables, female to whatever
  • 2 faston connectors 4,8 mm
  • 2 faston connectors 6,3 mm
  • Power supply with MicroUSB cable
  • Cardboard or other type of box, minimum 6 cm high (enough to house the button and the pi)
  • Tool to make holes in the box for the button and cable
  • Cable peeler and crimping tool
  • 5mm LED
  • LED holder for attaching to box
  • 3 jumper wires female to female
  • 1 resistor, 330 Ohm

Let's start by setting up the Raspberry Pi

  • Download the latest release of Noobs from https://www.raspberrypi.org/downloads/.
  • Extract the files and copy them onto the formatted SD-card.
  • Connect the Pi to a screen/TV using HDMI. Plug in a keyboard and a mouse.

Follow along with the installation instruction and install Raspbian. When that is done, click Menu > Preferences > Raspberry Pi Configuration and configure the Pi according to your own locale. Set up the Wifi, either the built in or the dongle. Also make sure you tick the checkbox for boot option "Wait for network".

When you're connected to the network, find your Pi's ip number by opening the console and running the command ip addr. Make a note of it, you'll need that later.

All Pis come with the default user 'Pi' and password 'raspberry'. It might be a good idea to change this if you expose the Pi on the internet. When I write piuser in the instruction, I mean the username you use, whether it's 'pi' or something else. :)

Using SSH to access Pi

When you need to write something in the console on your Pi, you can either do it on the Pi, or you can use SSH from another computer. If you're using Windows, you have to install an SSH-client. Install Cygwin with the OpenSSH-package to get access to SSH as well as SCP, which is needed to copy files to the Pi.

Log in to your Pi by opening a console on your computer and write SSH piuser@pi-ipnumber. For Windows, you use Cygwin. You will be prompted to input the password and then you'll be connected. Using SSH you can perform the same commands as if you were looking at the Pi's console. When the instruction here says Pi-console, you can use either SSH on your computer or the console on Pi.

Using remote desktop connection to access Pi

If you want to be able to connect remotely to the Pi and share screens with your PC/Mac, you can install TightVNCServer on the Pi. This is nice if you, like me, only have a laptop at home. I don't want to go over to the TV just to see the Pi desktop.

Follow the instructions here to set TightVNC up on Pi and your computer, and get it to autostart on the Pi: https://www.raspberrypi.org/documentation/remote-access/vnc/

Once installed, the Pi is accessible on port 5901.

Install Node.js on Pi

Depending on which model of the Pi you have, download and install the correct version of Node.js by opening up a Pi-console and writing:

Pi, Model A:
>wget https://nodejs.org/dist/v4.4.3/node-v4.4.3-linux-armv6l.tar.gz 
>tar -xvf node-v4.4.3-linux-armv6l.tar.gz 
>cd node-v4.4.3-linux-armv6l

Pi2 and Pi3, Model B:
>wget https://nodejs.org/dist/v4.4.3/node-v4.4.3-linux-armv7l.tar.xz
>tar -xvf node-v4.4.3-linux-armv7l.tar.xz 
>cd node-v4.4.3-linux-armv7l

Then copy the files to usr/local to make them accessible on the path:
>sudo cp -R * /usr/local/

You can remove the downloaded packages if you want to save space on your SD-card. Make sure everything installed correctly by writing node -v in your Pi-console. You should get back the version number, 4.4.3 in this case.

First hardware test: Connect a LED

Let's start with something really simple that explains the concept of the Raspberry Pi. The Pi has 40 pins: https://www.element14.com/community/servlet/JiveServlet/previewBody/73950-102-9-339300/pi3_gpio.png. There are pins for ground and power, and then there are the GPIO-pins (General Purpose Input/Output). In short, and without the gritty details, when you connect something that should be turned on, you want a circuit going through it from power to ground. But you also need a resistor somewhere in that circuit, because otherwise the current flowing through the circuit back to the Raspberry might be too high and fry your Pi.

So for the first test, you need a LED, three jumper wires F/F and a 330 Ohm resistor. Resistors are tricky, use the excellent help at http://www.hobby-hour.com/electronics/resistorcalculator.php to make sure you find the correct one. With a 5-band resistor, 330 Ohm has the code orange, orange, black, black, brown.

If you look at the LED, one leg is longer. This is the anode that should be connected to power. Start with pressing the anode leg into one end of a jumper wire. The other leg should be connected to ground, but with a resistor in between. Connect the ground leg to a jumper wire, insert a resistor in the other end of it and then another jumper wire after the resistor.


Now connect the anode jumper wire to a 3,3 volt pin on your Pi, and the ground jumper wire to a ground pin. Connect your Pi to power and Voila! Light!

So how do the GPIO pins work? Well, move the jumper wire you connected to power to one of the GPIO-pins instead. You might see that it's still on, but weaker. If so, it's in a state called 'floating'. The GPIO-pins can be in three states:
  • Low, which means it's outputting no current.
  • High, which means it's outputting 3,3v, just like a normal power pin.
  • Floating, which means it's in a random state, affected by electromagnetic fields and whatnot.
After this first test, I'm sure you can see what our programming will actually do. Set GPIO-pins to high or low! Turn things on or off.

First software test: turn the LED on programmatically

For this, we need to get our Node environment up and running. If you don't have Nodejs on your computer, follow the instructions here: https://nodejs.org/en/.

Download the PiNodeStarterProject from http://github.com/asalilje/PiNodeStarterProject. The project contains a package.json setting up the dependencies for manipulating the GPIO-pins, and a deployment file that makes it easy to move all your files to your Pi and start the app. The code is written using ES2015, which demands you have the line "use strict" at the beginning of each file.

Open the app.js file. You should see the following lines:
"use strict";
const GPIO = require('onoff').Gpio;

function exit() {
    process.exit();
}

process.on('SIGINT', exit);

What we do here is just importing the dependency to the excellent onoff-package and setting up an exitfunction that's run when the Nodeprocess ends, that is, when you press Ctrl + C.

To set a pin high or low, you need to first define the pin and the data direction. If you want to listen to a button it's 'in', but here, it's 'out'. Make sure your led is connected to ground and a GPIO-pin on the anode side. Check the number of the pin on the chart.

At the line after requiring the onoff-package, insert the code, (with your correct GPIO if it's not GPIO21):
const led = new GPIO(21, 'out');
led.writeSync(1);

Also, you want to turn off the light and kill the GPIO-definition when the process exits. Do this by modifying the exit function to look like this:
function exit() {
    led.writeSync(0);
    led.unexport();
    process.exit();
}

That's it. Now our program should turn on the LED properly with a full 3,3v!

To deploy this program to your Pi, go into gulpfile.js and change the hostname, user and password to reflect your Pi's setup. Save the file and in a console, cd to the project directory and write npm install to install the packages needed to develop the app. Don't worry if the Gpio-modules onoff and epoll won't install.

Move files to Pi
If you're on a Mac, running npm run deploy will create a directory on the Pi and copy files to it using SCP. Sadly, I haven't gotten the copy part to work on Windows yet, here you must run the script inside Cygwin and you will get a permission denied. After doing this, the directory is created and it's possible to handle the file copy by running the actual copy command directly in cygwin: scp app.jss package.json piuser@pi-ipnumber:/home/piuser/PiNodeStarterProject. You should be prompted for the user's password and the files are copied onto the raspberry. Now run npm run modules to install the node modules. When that is done, run npm run app to start the app on the Pi. Hopefully, everything is connected A-OK and the LED lights up.

Note, that this app can't be run locally on your computer when the onoff-package is required and called, since it needs access to the pins. If you want to test other logic in your program locally you have to work around that by triggering actions in other ways.

Time to connect the button!

The arcade button has 4 connectors. The ones on the side are for the LED inside the button. The other two are for the input. To connect the button, you need four jumper wires with one female end. That end is connected to the Pi. The other end needs to be cut and peeled to crimp on a faston connector.


Two 4,8 mm and two 6,3 mm connectors are needed. Since the jumper wires are very thin, it might help to peel off 2 centimetres of the shell so you can fold the copper thread and make it a bit thicker. Make sure you have a good crimping tool (or strong hands).


Connect the button LED
Let's try out the button LED first. Just connect the wider two flaton connectors to the connectors on the side of the button. Connect the one on the red side to a 3,3v power pin, and the other to ground. The LED shines! So all we need to do here is the same as we did with the other LED, connect it to a GPIO pin instead of a power pin. The LED has a built in resistor, so you don't have to add any to the circuit.


Connect the button switch
Output pins are easy to configure, but there's a bit more to an input pin. If an input pin is in a floating state, it could behave very randomly. We need a pin that has a pulldown or pullup resistor. Simply put, the pulldown resistor sets the default state of the pin as low and the pullup resistor sets the default state to high. Here, we don't care whether it's high or low, since we only want to listen to the button being pushed and not use the actual state of the button.

The GPIO pins on a Pi can be configured to use pulldown or pullup resistors, but let's just use one of the I2C ones, GPIO2 or GPIO3 since they have built in resistors. Connect the two remaining connectors on the button to the Pi, the lower one to ground and the higher one to GPIO2.


Let's try that out with some Node.js-coding. When we press the button, we want to light the button LED for 1 second. Insert the following code in your app.js file:
const buttonLed = new GPIO(4, 'out');
const buttonPush = new GPIO(2, 'in', 'falling');

buttonLed.writeSync(0);

buttonPush.watch(function(state) {
 console.log("Button pushed, state ", state);
 buttonLed.writeSync(1);
 setTimeout(function() {
  buttonLed.writeSync(0); 
 }, 1000);
});

Run npm run deploy to copy the files to your Pi. But instead of doing npm run app, use SSH to connect to your Pi and run your application from there. This will make it possible for you to see the output from the app. CD into /home/piuser/PiNodeStarterProject and write node app.js to start the application. Now push the button and see the LED turn on.

What you also will see is that each push of the button triggers several calls to the button.watch-function. One way to deal with this is to set the button as inactive the first time it's triggered and then activate it again as soon as your button action has been performed.

And that's basically it. Now you have a button with a built in LED, an extra LED to turn on when the app is running and a function watching for button pushes. What's left to do is decide what you actually want to do with your Big Red Button. And of course assemble the box. If you want to look at a project for inspiration, check out the CatBot that plays around with all these features and connects to Youtube and Twitter. Code is available on http://github.com/asalilje/catbot.

Last step - set up your app to start automatically on the Pi

Once you have your dream app up and running, I'm sure you want to be able to pull the plug on the Pi and get it to start your app automatically when booting next time. Here's how.

Go into your Pi-console and write sudo nano /etc/rc.local. Before the exit-statement, insert:
PATH=$PATH:/usr/local/bin
cd /home/PiUser/YourProject #path to your app
/usr/local/bin/node app.js < /dev/null >/var/tmp/startup.log 2>/var/tmp/startup.err &

This code snippet starts your node-app and logs errors so you can see if anything goes wrong during the startup. Restart your Pi to make sure the app starts.

Good luck, have fun!

Tuesday, 9 February 2016

Easy Singletons with CommonJS

Bye bye, singleton wiring and getInstance()!

CommonJS has a nice way of automatically creating singletons out of your modules. It's all in how you write your modules and what you export from them. No more hideous getInstance methods that drowns out the actual purpose of the module, sweet! If that's what you want, of course. If not, the behaviour might be a bit confusing... :)

CommonJS and Browserify

To be able to use the same syntax in your browser javascripts as you do in node, using CommonJS-modules with an exports-statement, you have to use a tool like Browserify or Webpack. I'm sure there are others out there too, but these are the ones I'm familiar with. Browserify is very easy to setup for small private projects. I'll try to walk you through it.

Project structure

The structure of this little project is the simplest possible: A source-folder containing Index.html and three js-files. Main.js is the entry point for the javascript source files and uses the colourFetcher.js and colourRepository.js to fetch and display colours. What we want to do is use Browserify to bundle up all the js-dependencies into one file that we can include in Index.html.

Install Browserify

You can find more info about Browserify on browserify.org. You need node on your machine, and then it's a cakewalk to install it:

In your root folder, create a package.json file if you don't already have one. This is done by running the command npm init in the terminal and answering the questions.

Install Browserify by running npm install browserify --save-dev in the terminal. This will install the package and add the dependency to the devDependencies-section of your package.json.

If you want to explore the options available, just type browserify in the terminal and take it from there. What we want to do now is just take all js-files in the src-folder and bundle them into a bundle.js-file placed in a public-folder. Just create a new folder named public under src and in the terminal, run browserify src/*.js -o src/public/bundle.js -d. The first part of the command is the glob-pattern for the files to bundle, the -o is the output location and -d stands for debug and means source maps will be generated. We probably don't want to have to remember this command, so change the script-section in package.json to look like this:
"scripts": {
  "start": "browserify src/*.js -o src/public/bundle.js -d"
}
Now you can handily run the site with the command npm start instead and add the bundle.js as the js-source for your index.html.
<!DOCTYPE html>
<html lang="en">
<head>
    <meta charset="UTF-8">
    <title>Singleton</title>
    <script src="public/bundle.js"></script>
</head>
<body>
</body>
</html>

Add Watchify

To add a nice watch-function that immediately re-bundles your files when they're modified, install Watchify with npm install watchify. Modify your package.json again with:
"scripts": {
  "start": "browserify src/*.js -o src/public/bundle.js -d 
     && watchify src/*.js -o src/public/bundle.js -d -v"
}
This will run browserify immediately followed by watchify with the verbose setting on (-v).

Back to the singleton issue

Now, we should have a nice environment up and running for trying out the quirks and wonders of CommonJS. For instance module caching. So let's create some code. First colourRepository.js:
var colourRepository = function () {
    var colours = {
        magenta: "#FF00FF",
        palegreen: "#98FB98",
        chocolate: "#D2691E",
    };

    var list = function (callback, message) {
        if (!message)
            message = "from repo";
        callback(colours, message);
    };

    console.log("new colourrepo");

    return {
        list: list
    };
};
module.exports = colourRepository;
ColourRepository.js just sets up a list of colours and passes them along into the callback function provided by the caller. If there's a message it gets sent back to the callback too, otherwise we add one.

Next up, colourFetcher.js, that requires colourRepository as a dependency and calls it:
var colourRepo = require("./colourRepository")();

var colourFetcher = function() {
    var list = function(callback) {
        colourRepo.list(callback, "from fetcher");
    };

    return {
        list: list
    };
};
module.exports = colourFetcher;
And last, main.js, that requires both of the modules and therefore fetches colour in two different ways:
var colourRepo = require("./colourRepository")();
var colourFetcher = require("./colourFetcher")();

colourRepo.list(listColours);
colourFetcher.list(listColours);

function listColours(colours, message) {
    console.log(message);
    for (var colour in colours) {
        console.log(colours[colour] + '=' + colour);
    }
}
If we run this code, we notice that the console logs "new colourrepo" twice. Once when the repo is required in main.js and once when it's required from colourFetcher.js. This is because we're exporting colourRepository as a function. When we require it, we call the function at the same time using var colourRepo = require("./colourRepository")();. No caching, no singleton.

So, what if we change the code in a couple of places? Instead of exporting a function in colourRepository.js, we change the last line to module.exports = colourRepository();. The exports-statement now returns the called function when the module is loaded. When we require the module in main.js and colourFetcher.js, we can now remove the call to that function: var colourRepo = require("./colourRepository");. As the code is run, the console only logs "new colourrepo" once, and with the tiniest of effort we've turned our colour repository into a singleton. :)

Summary

Modules in CommonJS are cached after the first time they're loaded. This means that require("colourRepository") will return the same object everywhere, if it is resolved by the same file. If this is not the wanted behaviour, the exports-statement of the CommonJS-module should return a function instead, and the calling script must call that function.

Thursday, 4 February 2016

Writing a pure javascript repository pattern

My javascripting needs work!

I suffer from javascriptus horribilis. I don't know why all my knowledge of object oriented programming and patterns disappear when I write javascript. It feels like I'm coding myself into a corner all the time. But I'm trying to improve. One step was to try and mix a bit of factory and repository thinking into my javascripts. Don't you just feel the weight of the Gang of Four-book sweeping in by now?


Basic train of thought

So the idea is this; think layers in javascript. That sounds like a very non-hipster thing I guess, stiff and overly complicated, but if we think 'components' or 'modules' instead it gets more hip by the minute. What I wanted to do was basically:
  • The calling component calls a repository, with a callback to trigger when the data returns.
  • A repository factory provides the available repositories to the calling component.
  • The repository exposes public methods for CRUD, provides data from some source and calls the callback provided from the calling component. Whether the source is static content, an external service or whatnot is not important, and the calling component doesn't have to know anything about that.
Code is available on Github. I like the Node-way of requiring modules, so I use Browserify to be able to write my code in commonjs-style.


A CRUD Repository

Let's start with creating a basic User Repository, userRepository.js.
var userRepository = function() {

    var get = function(id, callback) {
        callback();
    };

    var list = function(callback) {
        callback();
    };

    var save = function(user, callback) {
        callback();
    };

    return {
        get: get,
        list: list,
        save: save
    };
};

module.exports = userRepository();
The code executes when it is required (module.exports = userRepository()) and the methods get, list and save are exposed. Now we can require and call the repository from our main.js file:
var userRepo = require("./userRepository");
userRepo.get(1, getUser);

function getUser() {
    console.log("got the user");
}
This code requires the user repository and assigns it to the variable userRepo. Now we can call the get-method and send along the callback function that we want the user repository to execute when the data is fetched. For now, the callback just logs a message.


Implementing the CRUD-methods

Now, what the repo actually does can of course be whatever. Fetch data from an array in the repo, from external or internal services or from text files. I just fake a service by fetching the content of a json-file, users.json.
[
  { "id":1, "name":"User Number One" },
  { "id":2, "name":"User Number Two" },
  { "id":3, "name":"User Number Three" },
  { "id":4, "name":"User Number Four" }
]
To fetch these, I want to make an Ajax-call using a promise. Granted, promise is not a standard in for example IE, but there are nice polyfillers out there that will do the trick. The nice thing about promises is that you can chain methods together and the catch-clause catches errors in all of the then-clauses. In userRepository.js I extend my get-implementation to this:
var get = function(id, callback) {
    ajax.makeRequest('GET', 'users.json')
        .then(function (data) {
            var users = JSON.parse(data);
            var user = users.filter(function(user) {
                return user.id === id;
            });
            if (user.length > 0)
                user = user[0];
            callback(user);
        })
        .catch(function (err) {
            console.error('Ouch, there was an error!', 
            err.statusText);
        });
};
I make a request to users.json and when the promise is resolved and returns, I parse the data, filters the users by id and returns the correct user. Yeah, not the most efficient way to get a user, agreed, but it's there to show that there's a middle layer between the actual ajax-request and the component needing the data. :)

When the user is filtered and ready, the callback is executed, sending along the user. The ajax-component being used in the repo looks like this, but it's outside the scope here and really not important:
var ajax = function () {

    var createParams = function (params) {
        if (params && typeof params === 'object') {
            params = Object.keys(params).map(function (key) {
                return encodeURIComponent(key) + '=' 
                  + encodeURIComponent(params[key]);
            }).join('&');
        }
        return params;
    };

    var makeRequest = function (method, url, params) {
        return new Promise(function (resolve, reject) {
            var xhr = new XMLHttpRequest();
            xhr.open(method, url);
            xhr.onload = function () {
                if (this.status >= 200 && this.status < 300) {
                    resolve(xhr.response);
                }
                else {
                    reject({
                        status: this.status,
                        statusText: xhr.statusText
                    })
                }
            };
            xhr.onerror = function () {
                reject({
                    status: this.status,
                    statusText: xhr.statusText
                });
            };
            if (params) {
                params = xhr.params = createParams(params);
            }
            xhr.send(params);
        });
    };

    return {
        makeRequest: makeRequest
    }
};

module.exports = ajax();


A repository factory, just because factories are cool

After writing all possible repositories, the code in main.js looks quite nice. Lots of different repositories being required and assigned to variables though.
var dom = require("./domManager");
var userRepo = require("./userRepository");
var catRepo = require("./catRepository");
var colourRepo = require("./colourRepository");

userRepo.list(listUsers);
catRepo.list(listCats);
colourRepo.list(listColours);
colourRepo.get("magenta", showColour);

function listUsers(users) {
  users.forEach(function(user) {
      dom(".userList").addListItem(user.name, user.id);
  });
}

function listCats(cats) {
  var catsWithImages = cats.filter(function(cat) {
      return "image" in cat;
  });

  catsWithImages.forEach(function(cat) {
      dom(".catList").addHtml(
       "<div><img src='"+cat.image+"'></div>"
      );
  });
}

function listColours(cols) {
  for (var col in cols) {
      dom(".colourList").addHtml(
       "<div><b style='color:"+cols[col]+"'>"+col+"</b></div>"
      );
  }
}

function showColour(hex) {
  dom(".bestColour").element.style.backgroundColor = hex;
}
The repository factory to the rescue! Easy-breezy repositoryFactory.js takes care of the plumming:
var repositoryFactory = function() {
    var repos = this;
    var repositories = [
      {name: "users", source: require("./userRepository")},
      {name: "cats", source: require("./catRepository")},
      {name: "colours", source: require("./colourRepository")}
    ];

    repositories.forEach(function(repo) {
       repos[repo.name] = repo.source;
    });
};

module.exports = new repositoryFactory();
The factory contains an array with all available repositories. When it is required, it loops through the repos in the array, requires all of them and assigns them to properties on 'this'. Since they execute when they are required, they're all exposing their public methods and are ready to be used. Neat and tidy. And now we can do this in main.js:
var repos = require("./repositoryFactory");

repos.users.list(listUsers);
repos.cats.list(listCats);
repos.colours.list(listColours);
repos.colours.get("magenta", showColour);

Wednesday, 13 January 2016

Writing a touch enabled responsive slideshow in pure javascript

The issue at hand

I've kind of started to enjoy Javascript and even CSS as of lately, and decided to try to write a slideshow in pure Javascript, no frameworks or frills involved. We use slideshows all the time on different web sites, be it good or bad, but I'm always resorting to some kind of component or framework. And there's plenty of good ones out there, doing lovely stuff, but since I'm not that well versed in advanced Javascript, I can't really read the code and understand what's actually happening. 

Another issue is of course that these awesome frameworks are so generic and cover all possible options and devices out there, which in all honesty makes the code a bit bloated. And when we started to write our own code at work, I realised it can actually be done. I managed to get the JS-part down to 250 lines, yay! Demo is here. Code is found on Github.

What I wanted to solve

  • It should be written in pure Javascript, with no frameworks or mysteries.
  • It must be responsive.
  • It must handle touch events.
  • It must be possible to have several slideshows on the same page, when the slideshowmania hits.
  • It must be able to handle both looping and not looping slideshows.
  • And for fun, it must handle the people not using Javascript. Because you never know, Javascript might disappear, right?

What I didn't care about

It's not like this slideshow is going to take over the world, so I'm not too worried about:
  • Old browsers. Basically, if it works on my machine, a Macbook with OSX and Windows 10, with latest versions of Safari, Chrome, Firefox and Edge on it, I'm happy.
  • Testing on real life phones or tablets. If it works on my Nexus 6p with Chrome, I'm happy.
Which means there's room for improvement, to say the least. :)

Basic idea

The idea behind this slideshow is simple; an outer container holding a number of slides. The slides are vertically aligned, by setting them as inline-blocks and not wrapping whitespace on the outer container. View code at Codepen.

To remove the annoying 4 pixels between inline-blocks, there are a number of tricks. I set the font-size to 0 on the outer container, that works fine. That's basically it. Now we need some smart behaviour to turn this into a slideshow.

No javascript

This is easily handled with this markup. All we do is set the outer container to overflow-x: auto. This will make it horizontally scrollable. So if we have the class 'no-js' in an outer container, we change the CSS of the slideshow: View Codepen. Now we have the world's simplest slideshow, neat. :)

No touch - desktop browser

For desktop browsers, we'll make the outer container hide it's overflow and present buttons that will move the slides back and forward. There are a number of ways to do the scrolling, but I went with CSS transforms and transitions. View Codepen.

Touch - phones and tablets

For touch devices, we want to still present the buttons, but also make it possible to swipe between slides. For this, there are four events we have to listen to:
  • Touchstarted - a touch has been detected. We save the pixel position and timestamp.
  • Touchmove - finger is moving over the screen. We want the slide to move with the finger.
  • Touchend - touch ends. We want to check the position, move to next or previous slide or just stay where we are.
  • Touchcancel - touch moves outside area. We want to cancel the ongoing touch and set start position to null.
We'll use CSS transforms again to move the slide along with the finger, but this time without the transition. View Codepen.

For the touchend handler, we want to move to another slide if the touch has been really quick, like a flick, or if the touch has passed a certain percent of the slide. View Codepen.

Not much more to it, except handling touch details like cancelling vertical swiping and handling what to do when you've reached the end of the slides.

Looping

How to handle looping? Well, I've just added an extra first and last item to the DOM so when we loop we use the extra slides that are placed at the end of the array. Once the transition is done we do another transform without transition effect so the array of slides actually ends up at the "real" first and last item. Confusing? View the code on Github. :)

Feature checking without Modernizr

Modernizr is an excellent framework for detecting which features a browser has, but since I'm not using any frameworks we'll do it ourselves. In the HTML-file, I set a class in the HTML-tag named "no-js". Further down, I remove it using Javascript. If Javascript is not enabled, the class stays. Easy! For the touch/no-touch feature I use another small snippet of code. View Codepen.

Saturday, 14 November 2015

To settle down and feel content

In 1997 I started working professionally as a programmer, to the surprise of my family and friends. I really have a masters degree in economics and sociology, majoring in marketing. This, however, felt boring to me. My real interest was art and computers. My brother bought a ZX Spectrum when I was 11 and we spent a lot of time in front of it, writing basic and inputting game code from magazines like Sinclair User. After the Spectrum, I went with Atari, which also was the computer I wrote my master exam on when I graduated from university. I've often wondered if they could ever read that floppy disc...

So when the web came along, I started creating web pages. Art and computers baked into one! Around 1995, I spent my time doing web pages for the organisation I was really supposed to write a marketing plan for. In 1996 I worked in health care, and instead of doing my job as a controller, I worked on an application in MS Access where the wards could do their own financial monitoring. And then I realised it was time to move on. I started my own web company and 6 months later, I was sucked into the blossoming dotcom industry in Stockholm.

In the beginning, I was fascinated by the new industry. The career path seemed clear. You were supposed to start with front end development, considered lowest in rank, move to back end or the data layer and then advance to project management. The companies were young and the people were all the same age, but already split into two teams. Developers, casually dressed and not trusted to meet clients, and project managers, dressed in suits and handling all the external communication. I was especially fascinated by the fact that the 25-year old women with the same engineer exams as the developer blokes were all project managers. Was it because they were the ones who could talk to clients, because they didn't feel comfortable in the developer group or because of the higher status? Almost 20 years later, I don't know.

I went into the industry because I had a great interest in developing applications that would make life easier for people and organisations. I don't have an exam, I've never studied any technology. So the first 10 years, I always felt insecure. I felt like I didn't really belong, I didn't know the correct terms, I didn't dare to push my views forward because I was always being put down by someone who knew more than I did. And it was easy to put me down, since my self confidence was at rock bottom. Because - I was still a developer. 10 years in the industry and still a developer! What's wrong with me?!

And I fell into that trap. The title trap. Am I really only a developer? Didn't I design and build that CMS? Didn't I design and build that betting sportsbook? Am I not really - an ARCHITECT? At least I should be by now. My employer definitely wanted to sell me as an architect, since it meant more money. And wasn't it really strange, not having the ambition to become anything more than a mere developer? To top it off, being a FEMALE ARCHITECT! Wow, I could probably get my own TV-show! So I went along with it. I went for a Microsoft Professional Architect Certificate. And the years following that was the worst years in my working life.

Why that was, I've tried to dissect. Maybe it was me, with my lousy self confidence, feeling I wasn't living up to the standard I should have. Maybe it was the organisations, having different views on what an architect should do. Maybe it was the younger blokes in some places who made my life hell. Maybe it was my feeling of being hired because WE NEED WOMEN IN TECH and I constantly had to prove I was as good as a man. Anyway, I woke up many Monday mornings and thought about doing something entirely different. Like, maybe, work as a waitress or something... Something I could manage.

The thing is, once you're in that position, it's hard to back out of it. You tell your manager you don't want to have that role. They say they're happy with your work and wants to help you move forward instead of back. And you have that bad feeling that if you back out, you're a failure. Because just saying that "In 3 years time, I still want to be a programmer, only much better" isn't really the level of ambition most companies expect.

I could say it's only me, but when I look at my fellow developer contacts on LinkedIn I see Senior Developers, Solution Architects, Team Leads etc etc. And I wonder, for us as an industry where we developers talk so much about self organising teams, joint responsibility, flat organisations... Where did this need to rise above the rest appear? Why do we feel the need to say that we are SENIOR developers?

For my own part, I've left all of that behind. I'm a developer, in an awesome team, where everyone chips in and I never have the need to lead anything anymore. With that I mean I never have the feeling that tomorrow, when I get in at work, I need to know exactly what to do and how because everyone expects that of me. Mob programming have changed all that around for me. We build awesome things together, I contribute with my knowledge and experience as do every individual in the team. And every day, I learn something new. I go home feeling that it has been a good day, I don't work late when the kids have gone to sleep, and I go to work full of energy the next day. And after 20 years of building web sites, I actually think that this is the best time I've ever had. :)

Maybe one day I'll write about this WOMEN IN TECH-bit.

Wednesday, 11 November 2015

Setting up feature branch deploys using Github, Teamcity and Octopus Deploy

Sooner or later, when you have a website in production, the question arises: how to develop new features without deploying partly built features along with bug fixes? Feature toggles might be the way to go. But that can be tricky to implement, and almost always needs code cleanup after the feature is released.

We decided to try and find a way where we could quickly deploy any given feature branch if we needed to. Since we mob program we mainly work directly in the master branch, but sometimes we do bigger features that need to be looked at or tested outside the team.

Really short version - the quirks

  • Custom builds can not trigger another build using the Finish Build Trigger in Teamcity.
  • Variables can be passed from Teamcity to Octopus Deploy only if they are set up as prompted variables in Octopus.
  • The prompted variables in Octopus Deploy have to be set up directly on the project, not in an included variable set.

Deploy process

What we wanted to achieve was being able to trigger a build manually in Teamcity, by stating:
  • Which branch to deploy.
  • Which config transformation file to use (stage, pre-production, production).
  • Which subdomain to deploy to.
This would then create a release and deploy to one of five preconfigured Octopus Deploy projects, which did the rest of the job by setting up the IIS and deploying the Nuget package published by Teamcity. The reason we wanted to have these five preconfigured projects was to have a dashboard available where we could easily see what feature branch was deployed where.

There are of course many other ways to solve feature branch deploys, but we wanted to have the manual step to choose what branch to deploy where and with what config.

Teamcity setup

First step was to set up a new build template in Teamcity. We have multiple projects and use build templates extensively to help us set up new builds quickly. The normal builds are quite basic:

Step 1 - Build

  1. Triggered by Github change to a certain VCS root.
  2. Runs Nuget restore.
  3. Runs Grunt tasks.
  4. Builds .Net sln.
  5. Runs tests.
  6. Copies minified files from grunt step into package.

Step 2 - Deploy

  1. Triggered by finishing build in step 1.
  2. Creates a Nuget spec.
  3. Packages the artifact from step 1 using the Nuget spec.
  4. Publishes the Nuget package to Octopus Nuget feed.
  5. Creates a release in Octopus Deploy and deploys it to stage environment. The Octopus plugin for Teamcity, which is simply a wrapper for octo.exe, works like a charm.
This seemed easy to convert into a feature build. Small changes in how to set up the Github VCS, how to decide which Octopus project to use and how to tell Octopus which config to use.

Set up custom build

To get the parameters in Teamcity that you require for each build, just set them up as required prompts. These can be configured as text fields, select lists etc. For our BranchToBuild we used text field, but for the Subdomain to deploy to and the ConfigTransformFile to use we added select lists.


Now, when we click the Run button for the build, we have to fill in those fields. Sweet!


One thing though! Custom builds in Teamcity can not trigger another build using the Finish Build Trigger. Our solution was to just merge the build and deploy steps into a single build. It took a few hours to discover why the trigger didn't work, and it hurt a bit to get a build consisting of 14 steps, but the show must go on, right?

Get the correct code from Github

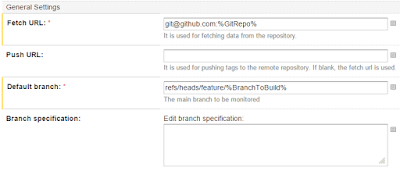
In our normal builds we've configured the VCS root to look for changes in the master branch of a certain repo, or pull requests. In the feature branch we of course want the code to be fetched from the branch we input when we trigger the build. Easy thing, just open the VCS root and use the BranchToBuild parameter in the Default branch-field.


Naming of deploy Nuget package

This one we thought a bit about. We decided to go with a "Feature"-package id, instead of naming the packages according to their different application names like we normally do. The reason for this is that Octopus Deploy needs to be set up to look for a certain Nuget package id. By naming all the packages "Feature" we could set up five identical and application agnostic Octopus Deploy projects.

Creating an Octopus Deploy release

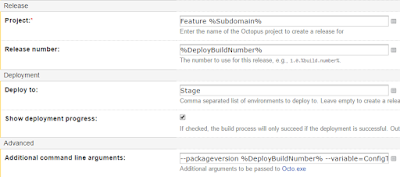
We want to deploy our feature to the Octopus Project that corresponds to the subdomain we chose in the first step. The Octopus projects are named Feature F1 to Feature F5 so we just use the parameter Subdomain to set the correct project. As release number we use the parameter DeployBuildNumber which is simply the concatenated build counter, product and branch name, e g '1.0.9-Product-Testbranch'.


When creating a release, Octopus Deploy automatically looks for the Nuget package with the highest release number. This is not what we want here though. Many builds use the same "Feature"-package id and the release number created might not be the highest one, since the build counter will be different for each build. Luckily, the Octopus plugin gives us a possibility to use the command line options of octo.exe. We have two options we need:
  • --packageversion %DeployBuildNumber% tells Octopus to use the specified release of the package instead of the default one.
  • --variable=ConfigTransformationFile:%ConfigTransformationFile% sets the variable ConfigTransformationFile in Octopus to the specified value, which is the config file stated in our input parameters.
When calling octo.exe to create a release, it's possible to send along variables like above. Important to know is that this can only be done if the variable is set up as a prompted variable in Octopus Deploy.

Octopus Deploy

In Octopus, we normally use a rolling deploy, taking the machines out of the load one by one, configuring IIS, setting up firewall rules, deploying, smoke testing and putting them back in the load if everything succeeds. Now, all we want to do is deploy the given "Feature"-package to a certain IIS website using the given transformation file.

We make extensive use of Step templates to create the building bricks for our deploy processes, it's a brilliant feature. Especially in this case where we want to be able to easily add new Feature deploys.

Deploy process setup

Our set up in Octopus Deploy is one project for each available feature deploy subdomain, F1 to F5. This could be changed to just using one and dynamically setting the hostname and IIS to deploy to, but we wanted to have a dashboard in Octopus where we could see what feature is currently deployed where.

Doing it like this is a fairly simple process. The release gets created in the project belonging to the subdomain chosen in Teamcity. The only thing that actually has to be handled dynamically is receiving the ConfigTransformationFile-variable to decide which config should be deployed.

To be able to receive a variable through octo.exe, two things are necessary:
  • The variable has to be set up as a prompted variable.
  • The variable has to be set up directly in the project, it will not work if it's in an included variable set.
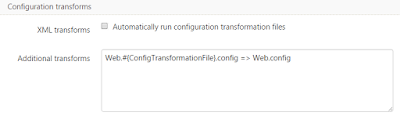
Once the variable has been set up, it's ready to use in the Deploy Nuget Package-step of your process.