We decided to try and find a way where we could quickly deploy any given feature branch if we needed to. Since we mob program we mainly work directly in the master branch, but sometimes we do bigger features that need to be looked at or tested outside the team.
Really short version - the quirks
- Custom builds can not trigger another build using the Finish Build Trigger in Teamcity.
- Variables can be passed from Teamcity to Octopus Deploy only if they are set up as prompted variables in Octopus.
- The prompted variables in Octopus Deploy have to be set up directly on the project, not in an included variable set.
Deploy process
What we wanted to achieve was being able to trigger a build manually in Teamcity, by stating:- Which branch to deploy.
- Which config transformation file to use (stage, pre-production, production).
- Which subdomain to deploy to.
There are of course many other ways to solve feature branch deploys, but we wanted to have the manual step to choose what branch to deploy where and with what config.
Teamcity setup
First step was to set up a new build template in Teamcity. We have multiple projects and use build templates extensively to help us set up new builds quickly. The normal builds are quite basic:Step 1 - Build
- Triggered by Github change to a certain VCS root.
- Runs Nuget restore.
- Runs Grunt tasks.
- Builds .Net sln.
- Runs tests.
- Copies minified files from grunt step into package.
Step 2 - Deploy
- Triggered by finishing build in step 1.
- Creates a Nuget spec.
- Packages the artifact from step 1 using the Nuget spec.
- Publishes the Nuget package to Octopus Nuget feed.
- Creates a release in Octopus Deploy and deploys it to stage environment. The Octopus plugin for Teamcity, which is simply a wrapper for octo.exe, works like a charm.
Set up custom build
To get the parameters in Teamcity that you require for each build, just set them up as required prompts. These can be configured as text fields, select lists etc. For our BranchToBuild we used text field, but for the Subdomain to deploy to and the ConfigTransformFile to use we added select lists.
Now, when we click the Run button for the build, we have to fill in those fields. Sweet!

One thing though! Custom builds in Teamcity can not trigger another build using the Finish Build Trigger. Our solution was to just merge the build and deploy steps into a single build. It took a few hours to discover why the trigger didn't work, and it hurt a bit to get a build consisting of 14 steps, but the show must go on, right?
Get the correct code from Github
In our normal builds we've configured the VCS root to look for changes in the master branch of a certain repo, or pull requests. In the feature branch we of course want the code to be fetched from the branch we input when we trigger the build. Easy thing, just open the VCS root and use the BranchToBuild parameter in the Default branch-field.
Naming of deploy Nuget package
This one we thought a bit about. We decided to go with a "Feature"-package id, instead of naming the packages according to their different application names like we normally do. The reason for this is that Octopus Deploy needs to be set up to look for a certain Nuget package id. By naming all the packages "Feature" we could set up five identical and application agnostic Octopus Deploy projects.Creating an Octopus Deploy release
We want to deploy our feature to the Octopus Project that corresponds to the subdomain we chose in the first step. The Octopus projects are named Feature F1 to Feature F5 so we just use the parameter Subdomain to set the correct project. As release number we use the parameter DeployBuildNumber which is simply the concatenated build counter, product and branch name, e g '1.0.9-Product-Testbranch'.
When creating a release, Octopus Deploy automatically looks for the Nuget package with the highest release number. This is not what we want here though. Many builds use the same "Feature"-package id and the release number created might not be the highest one, since the build counter will be different for each build. Luckily, the Octopus plugin gives us a possibility to use the command line options of octo.exe. We have two options we need:
- --packageversion %DeployBuildNumber% tells Octopus to use the specified release of the package instead of the default one.
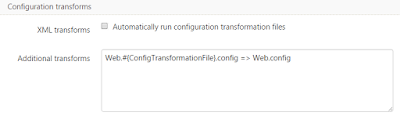
- --variable=ConfigTransformationFile:%ConfigTransformationFile% sets the variable ConfigTransformationFile in Octopus to the specified value, which is the config file stated in our input parameters.
Octopus Deploy
In Octopus, we normally use a rolling deploy, taking the machines out of the load one by one, configuring IIS, setting up firewall rules, deploying, smoke testing and putting them back in the load if everything succeeds. Now, all we want to do is deploy the given "Feature"-package to a certain IIS website using the given transformation file.We make extensive use of Step templates to create the building bricks for our deploy processes, it's a brilliant feature. Especially in this case where we want to be able to easily add new Feature deploys.
Deploy process setup
Our set up in Octopus Deploy is one project for each available feature deploy subdomain, F1 to F5. This could be changed to just using one and dynamically setting the hostname and IIS to deploy to, but we wanted to have a dashboard in Octopus where we could see what feature is currently deployed where.Doing it like this is a fairly simple process. The release gets created in the project belonging to the subdomain chosen in Teamcity. The only thing that actually has to be handled dynamically is receiving the ConfigTransformationFile-variable to decide which config should be deployed.
To be able to receive a variable through octo.exe, two things are necessary:
- The variable has to be set up as a prompted variable.
- The variable has to be set up directly in the project, it will not work if it's in an included variable set.
Great article!
ReplyDelete